Ampletracks User Tutorials#
We will be using https://demo.ampletracks.com for this tutorial.
In this User tutorial we will be creating a record for an ingot of Steel received from Company A. We want to perform EBSD on the sample so need to section it to smaller pieces. We will be using a TESCAN Mira3 LC FEG-SEM to perform EBSD with a Oxford Instruments Symmetry S1 detector. We will be storing the EBSD maps on an area of our local drive. We will be using Aztec Crystal Software to analyse the data. We want a way to track this work and decide to use Ampletracks to index the samples and EBSD maps, and relate them to each other and the acquisition equipment.
We will (covered in sections Create a Sample record - Create a relationship between the Sample and Dataset Records):
Create a Sample Record for the ingot
Create a ‘Sub-Sample’ Record from our original Sample Record (or Child Sample, as is referred to in Ampletracks) for our sectioned steel ingot
Create a Dataset record to index the EBSD map data, which is stored in a local drive
Edit these records to relate them to each other
Important
The Record Child Record relationship is intrinsic and does not require any manual input from the User other than the creation of the Child Record
Once we have performed our analysis on the raw data, we want to track that analysis. We will:
Create a Child Dataset Record from the original Dataset Record
Relate that Child Record to the Analysis Tool Record for Aztec Crystal Software
This above is covered in sections Create an analysed Dataset record (Child) and Relate the analysed Dataset to the Analysis Tool
Create a Sample record#
Here, we are creating a Sample Record for the steel ingot as received from Company A. To create the sample record:
Navigate to the Samples listing
Click on the Add Sample button
Follow the form and fill:
A
Unique name of the sampleof your choiceMaterialdetails, i.e. the comprising elementsDescription of the sampleIndicate any
Process historybefore receipt from Company ALocationIndicate that the Sample was received from Company A in
Additional informationContact nameContact email
Click the Save, or Save & Close button, once you have submitted all your Sample details
Create a sub-Sample record#
We need to create a sub-Sample Record for our sectioned part of the ingot, which we will use for EBSD data acquisition.
To do this:
Navigate to the Record of the Sample you just created
Click the + New child record button, which is within the Descendants box, below the main Sample menu
A new Record form will open up with some inherited features
Inspect the form before modifying anything
Uncheck the inherited box for the field
Unique name of the sampleType out a description in the
Process historyto indicate that this is a cut-off of a larger ingot and has been prepared for EBSD data acquisitionClick the Save, or Save & Close button
Edit the Sample details#
Now that we have a Sample and Child Sample Record, we can try editing either or both of them.
Navigate to the Record View mode
Click on the Edit button
Modify some of the details about the sample, either the
Additional informationorProcess historyClick the Save, or Save & Close button
Add a QR code to a pre-existing sample#
Add the QR code#
For this part you will be handed a QR code sticker.
Grab an object you would like to use as a Sample
Inspect the QR code sticker, you will see a number, as shown in Fig. 21

Fig. 21 An example QR code label sticker.#
Navigate to the Sample Record you want to associate with the QR code label and enter Edit mode
Type in the number of your label in the text box underneath the
Assign label:title, in the Labels area. The number in this example is0001928or1928, as shown in :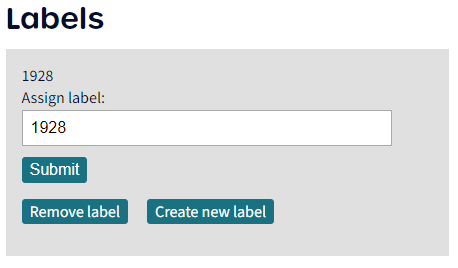
Fig. 22 The Labels area in a Record#
Click out of the area in a non-responsive part of the form, a Submit button should appear
Click the Submit button
Now click the Save, or Save & Close button
Your Record in now associated with the label
Test out the QR code#
Not logged in#
For this part, you willneed to use a device with a camera. We strongly recommend that you open up an incognito window, log out of Ampletracks, or use your phone
Connect to https://demo.ampletracks.com
Click on the Want to scan a label? area, as shown in Fig. 23
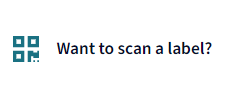
Fig. 23 The Want to scan a label? area in the Ampletracks login page on a Desktop browser#
Grant permission to Ampletracks to access your camera
Plan the label within the camera window
The label will scan and redirect you to a window listing some details about your Record, as shown in Fig. 24
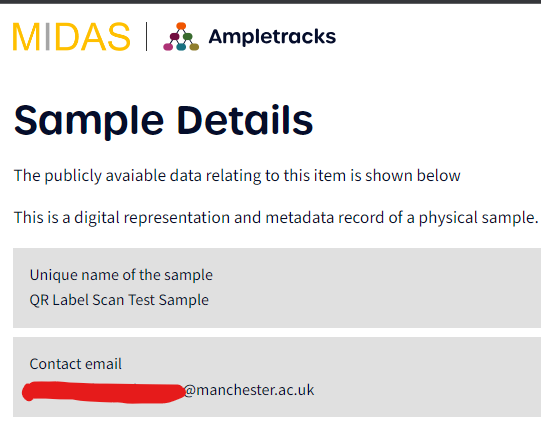
Fig. 24 Public details about a Sample Record displayed when scanning a QR code label when not logged into the system#
Logged in#
Now, feel free to repeat the steps detailed in section Not logged in when logged into Ampletracks.
Create a Dataset record#
Switch to the Dataset Records listing page
Click on the Add Dataset button
Follow the form
You will reach a box where you will be prompted to add a link to a local file/directory or a cloud-stored file/directory
Try listing a local directory on your system following this ‘link’ convention
file:///explicit-full-path-to-directory-or-fileFill in all other details for your Dataset Record
Now click the Save, or Save & Close button
Create a relationship between the Sample and Dataset Records#
Navigate to the Dataset Record you just created
Click on the Edit button
Click on the
-- Add new relationship --drop-down menu, under RelationshipsInvestigate what types of relationships you can form by choosing any available option
Start typing in the text box that will appear
Hint
By typing
___or%%%you can see a list of all available options. Within a larger version of Ampletracks, you can also search for Records to relate your Record to by typing in the Record owner’s name in the text box.Choose a Record to relate it to
Click the Save, or Save & Close button
Create an analysed Dataset record (Child)#
Navigate to the Dataset Record for which you want to create a Child Record
Click the + New child record button, which is within the Descendants box, below the main Dataset menu
Follow the instructions in creating a new Dataset Record
Click the Save, or Save & Close button
The Child Dataset Record is intrinsicly relate to your Parent Dataset Record
Relate the analysed Dataset to the Analysis Tool#
Navigate to the Child Dataset Record you just created
Click on the Edit button
Click on the
-- Add new relationship --drop-down menu, under RelationshipsChoose
was analysed usingfrom the dropdown menuStart typing ‘AZtec Crystal Software’ (you needn’t type the full text in) in the text box that will appear
Choose the Analysis Tool Record to relate it to
Click the Save, or Save & Close button