Ampletracks User Guide#
The following guide relates to using a version of Ampletracks built for the Henry Royce Institute, which is hosted by us, and can be found on the website royce.ampletracks.com. We cannot guarantee that this guide will describe the user experience and explain how to use any externally hosted version of Ampletracks.
Navigating Ampletracks#
User interface#
Logging in#
When connecting to royce.ampletracks.com you will be greeted with a log-in page.
Input your personal log-in details (items 1 and 2 in Fig. 3)
Click Login (item 4 in Fig. 3)
You now have logged in to the royce.ampletracks.com app
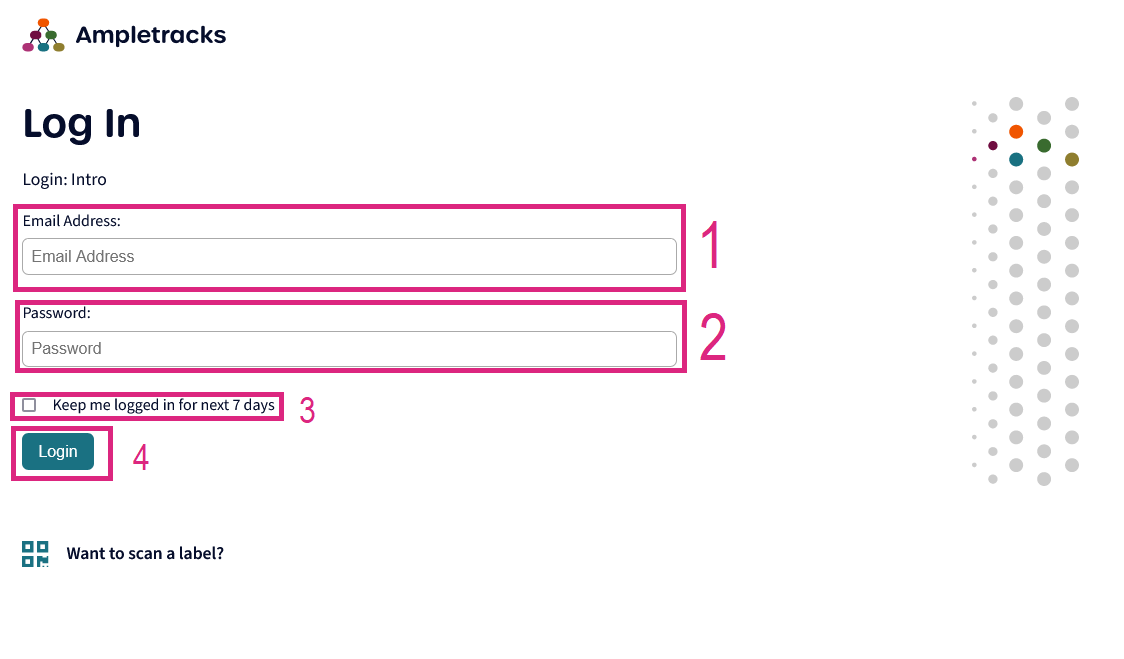
Fig. 3 The Royce Ampletracks Login page.#
Tip
If you will be using royce.ampletracks.com frequently, and are on a private machine that only you have access to then we suggest choosing ( item 3 in Fig. 3) Keep me logged in for next 7 days
Records Lists#
Once you are logged into the royce.ampletracks.com app you will be within a Records list. If this is not your first time logging in you will be taken to the Records list of the Record type you were viewing when you were last logged into the royce.ampletracks.com app.
Important areas in Fig. 4 are marked with numbers:
Item 1 will direct you to the Records listings (where we currently are)
Item 2 will allow you to switch between Record Types lists via dropdown menu
Item 3 allows you to scan a physical QR code label that is related to a sample. To learn more about QR code labels, please refer to …
Item 4 will take you to the account management page, where you can change account details such as your password, and contact details
Item 5 will allow you to add a new record of the Record list you are currently viewing, please refer to sections Creating a Sample Record, Creating a ‘Sub’-Sample Record, Dataset Records to learn how to create records

Fig. 4 The Records list for the Sample Record Type on Royce Ampletracks.#
User permissions#
When requesting an account on royce.ampletracks.com you will usually be given a ‘User’ role. This grants you usage of all of the basic capabilities royce.ampletracks.com.
As a ‘User’, you will be able to:
Create the Record Types ‘Sample; Dataset; Equipment; Experiment; Analysis Tool; Sub Project’
Important
The Record Types you have been given access to will vary. We consider Sample, Dataset and Equipment to be the essential building block records of a royce.ampletracks.com workflow.
Edit the Record Types ‘Sample; Dataset; Equipment; Experiment; Analysis Tool; Sub Project’ owned by you (i.e. your user)
Delete the Record Types ‘Sample; Dataset; Experiment; Analysis Tool; Sub Project’ owned by you (i.e. your user)
View the Record Types ‘Sample; Dataset; Equipment; Experiment; Analysis Tool; Sub Project’ owned by anyone on royce.ampletracks.com
List the Record Types ‘Sample; Dataset; Equipment; Experiment; Analysis Tool; Sub Project’ owned by anyone on royce.ampletracks.com
Create relationships between Records owned by anyone and records owned by you on royce.ampletracks.com
Note
You might find yourself using some record types more than others. Not every workflow will need to include all record types.
Records#
Ampletracks allows the User to create Records to index digital representations of physical and digital objects, and fill them with detailed metadata about those objects.
Using Ampletracks as a Sample Tracking app relies on 3 types of Records and 3 types of relationships, both intrisic and extrinsic.
Fig. 5 illustrates the 3 types of records with 2 of those extrinsic relationships. The Record Sample, a digital representation adn metadatat record of a physical object, is related to a Record Dataset that is created by acquiring data about that Sample on a piece of measurement equipment. The Record Dataset is related to the Record Equipment that was used to acquire that dataset.
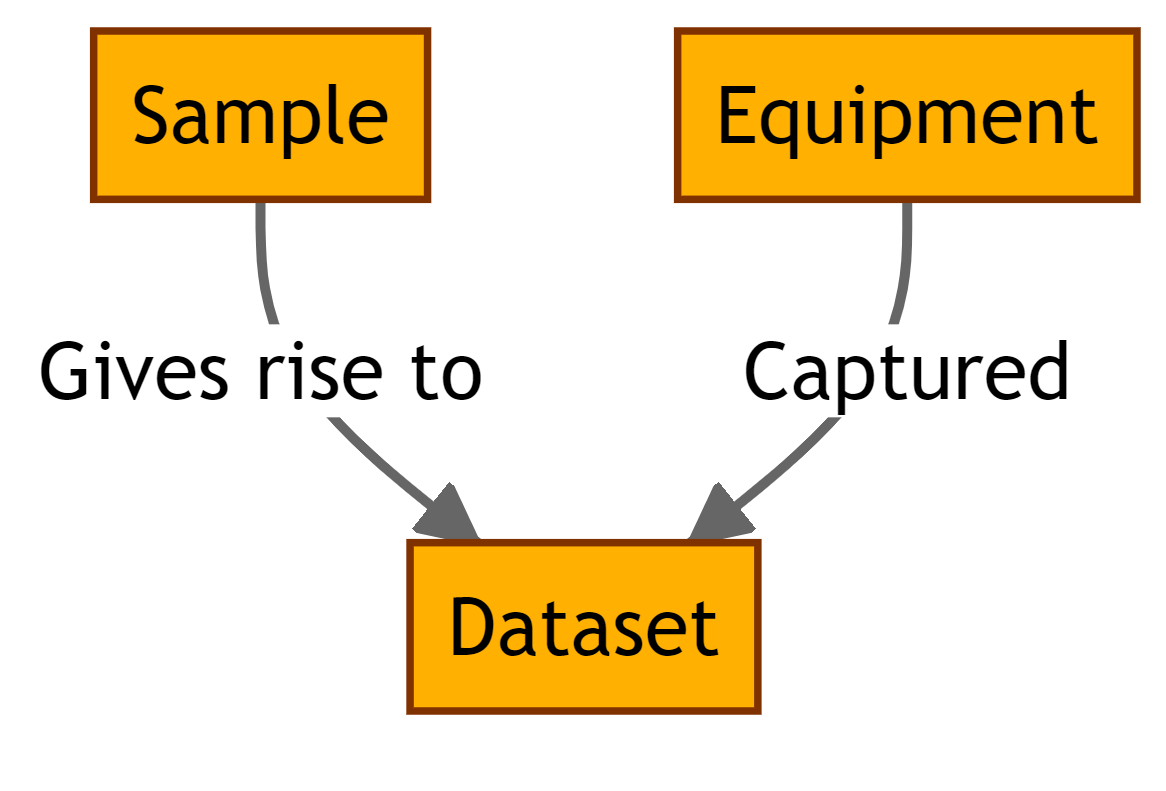
Fig. 5 The basic Ampletracks Record indexing and Record Type to Record Type relationship workflow#
Fig. 6 illustrates the same relationships illustrated in Fig. 5 with the intrinsic Record to Child Record relationship in the Sample Record.
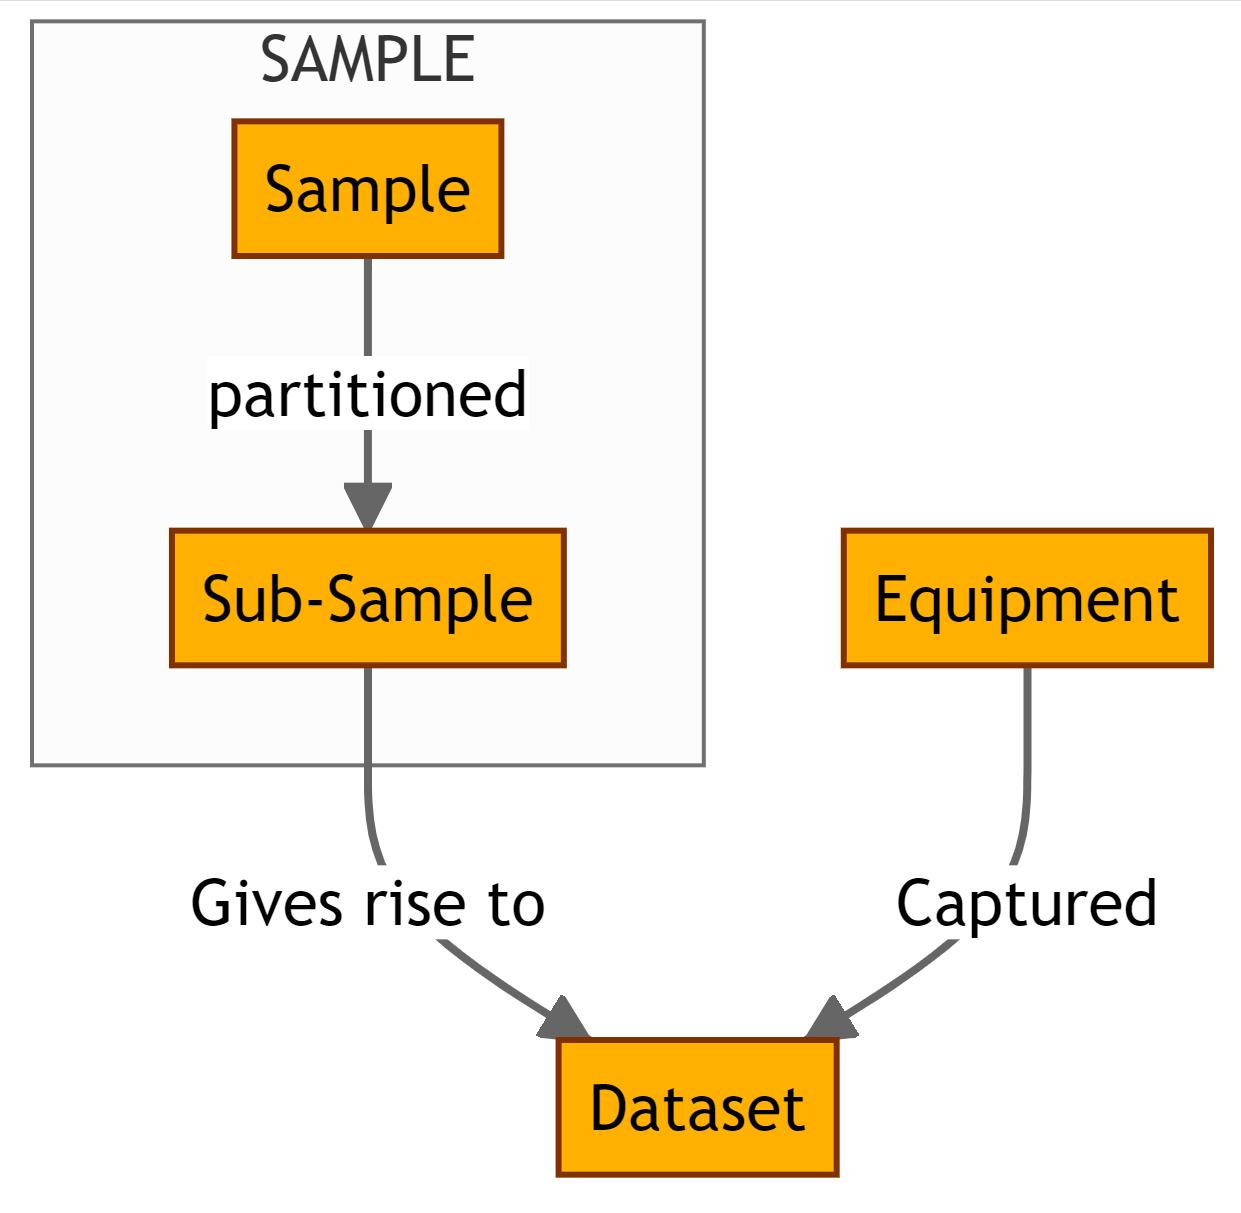
Fig. 6 The basic Ampletracks workflow, with the intrinsic Record to Child Record relationship#
Sample Records#
Sample records are digital representations of physical objects. These physical objects are laboratory samples, be it metals, batches of powder, coatings on substrates, or chemicals. Ampletracks has an inbuilt intrinsic Record to Child Record relationship, which can be utilised to relate ‘master’ samples, such as a large batch of power, or a large ingot of metal to ‘sub-samples’ such as a decant of powder taken for a specific measurement, or an ingot cutoff, respectively. This allows a User to keep a registry of the history of everything that has been ‘done’ to a sample, whether synthesized in lab, or received from a research partner.
Creating a Sample Record#
To create a Sample Record:
Navigate to the Records listing, item 1 in Fig. 4
Hover over the dropdown menu in item 2 of Fig. 4
Choose ‘Sample’, as illustrated in Fig. 7
Click on the ‘Add Sample’ button, item 5 in Fig. 4
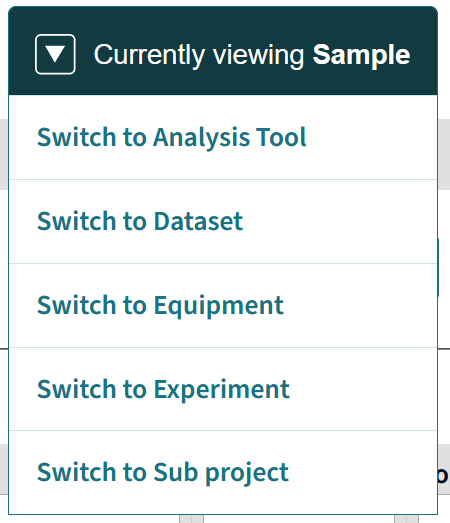
Fig. 7 The Ampletracks Record listing switch menu#
Add Sample Record details#
At the top of the Sample Record form, shown in Fig. 8, you will see some general fields inbuilt into each Record Type.
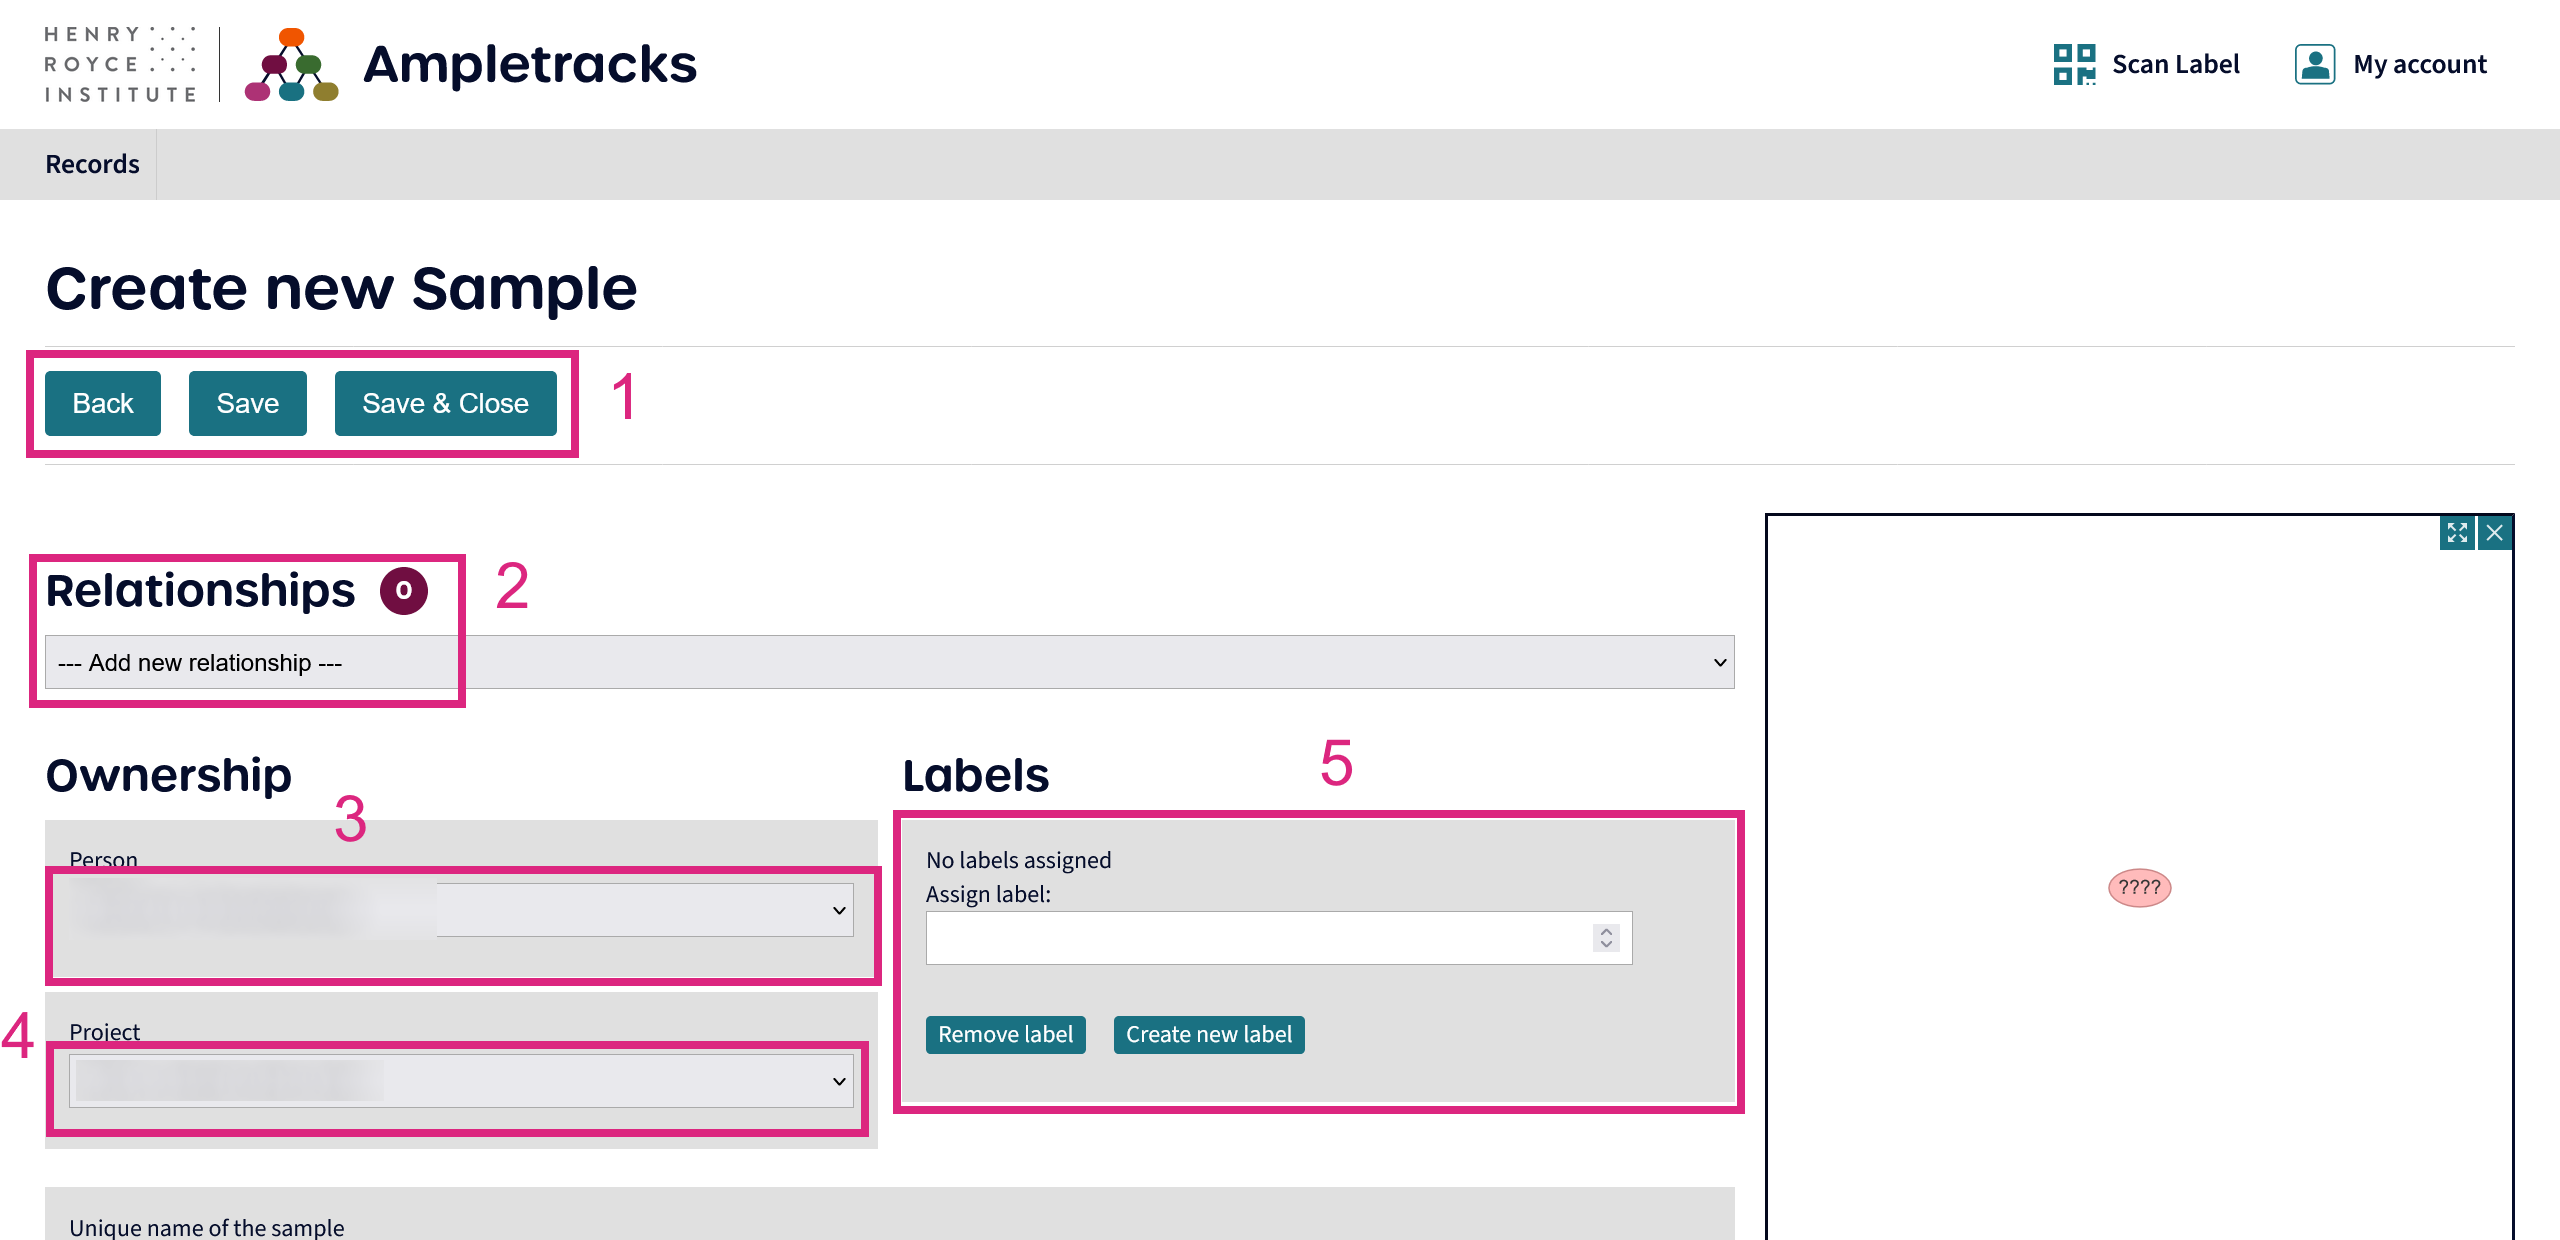
Fig. 8 The Ampletracks Sample Record form Top#
Note
The Sample Record form is quite extensive, although not all fields are mandatory, as it is we will not be able to show the full form on this page.
Item 1 allows you to save the record as you go, save and close, or back out of record creation, or editing
Item 2 allows you to add relationships to pre-existing Records, or create a new Record based on the Record Type of the Relationship you are wanting to specify
Item 3 is where the owner is specified, this is by Default, the User creating the Record
Item 4 is where the Project (or Grant) a User belongs to is specified
Caution
A User can belong to several Projects. Take care to specify the correct Project a Record belongs to.
Item 5 is where a User can add, remove, or create new QR code labels. Each label has a unique number that identifies it, which is distinct and not related to the Record ID. You can see this difference in item 3 of Fig. 10 We will look at QR codes in Section Adding a QR code to a Record
Fig. 9 shows most of the Sample Record form that a User would fill in with details about the sample
Fig. 9 The Ampletracks Sample Record form#
Creating a ‘Sub’-Sample Record#
The following can be referred to when creating Sub-Records (Child Records) of any Record Type.
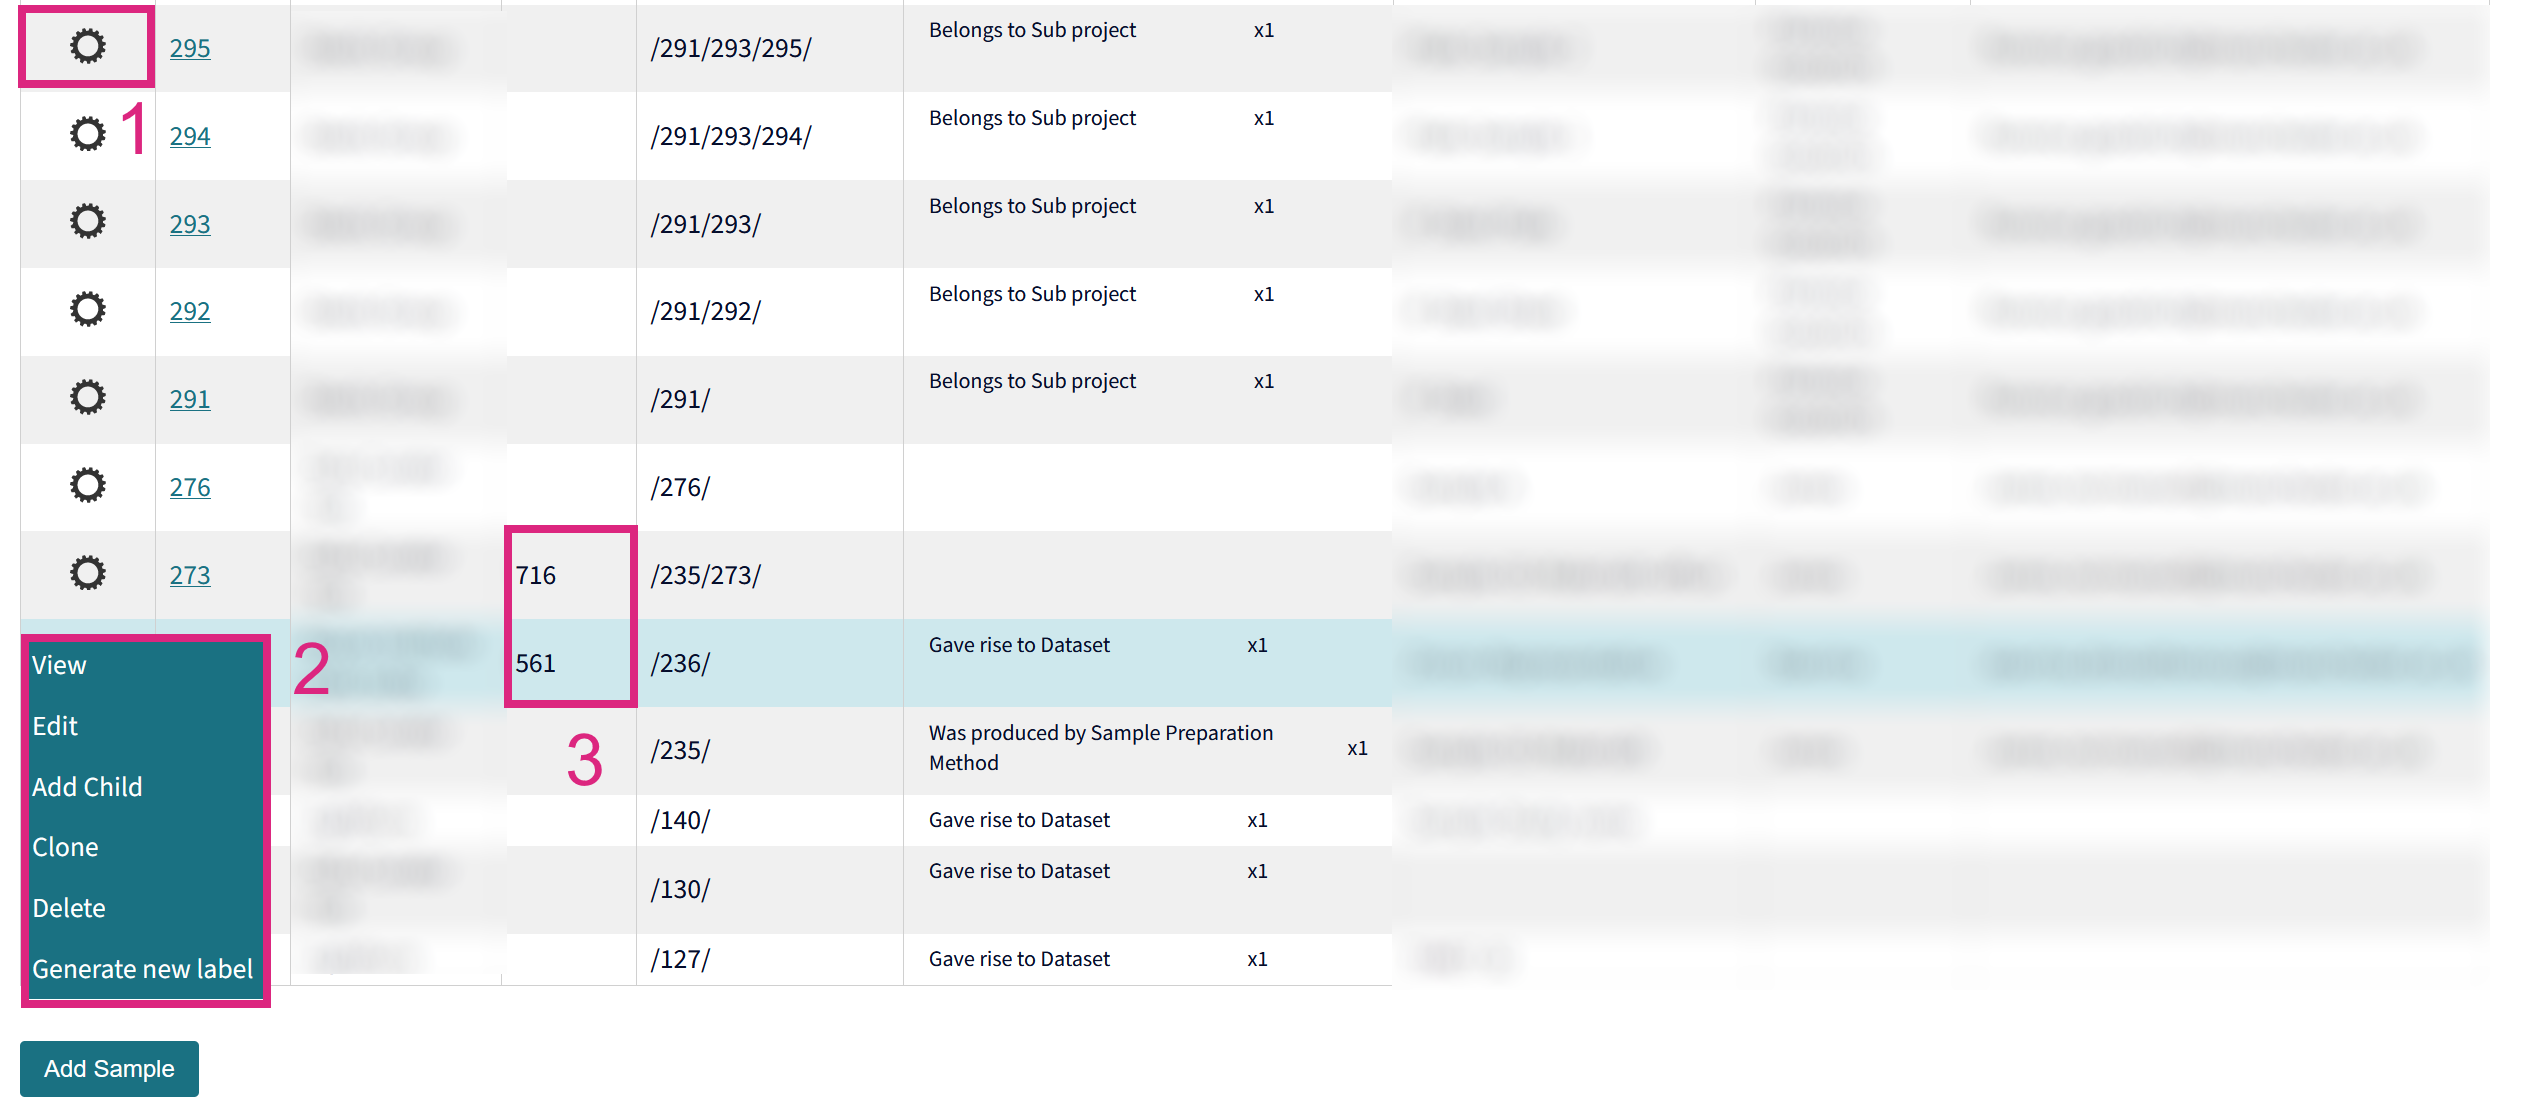
Fig. 10 The Ampletracks Sample Record form#
To create a Sub-Sample (Child) Record, you must first create a Sample Record. Following that, there are two ways to create a Child Record, creating it from the Record listing or from within the Record.
Hint
You can create a Child Record for any Record within a Record Family Tree, i.e. you can create a Child Record of a Child Record.
Create a Child from a Record listing#
Navigate to the Record listing of the Record Type of interest
Hover over the cog () icon of the Record of interest, illustrated in item 1 of Fig. 10
You will then see a hover menu, item 2 of Fig. 10
Click on ‘Add Child’
You will be redirected to a Child Record form, with some inherited fields already filled in
Create a Child from within the Parent record#

Fig. 11 Adding a Child from Record View#
Editing a Record#
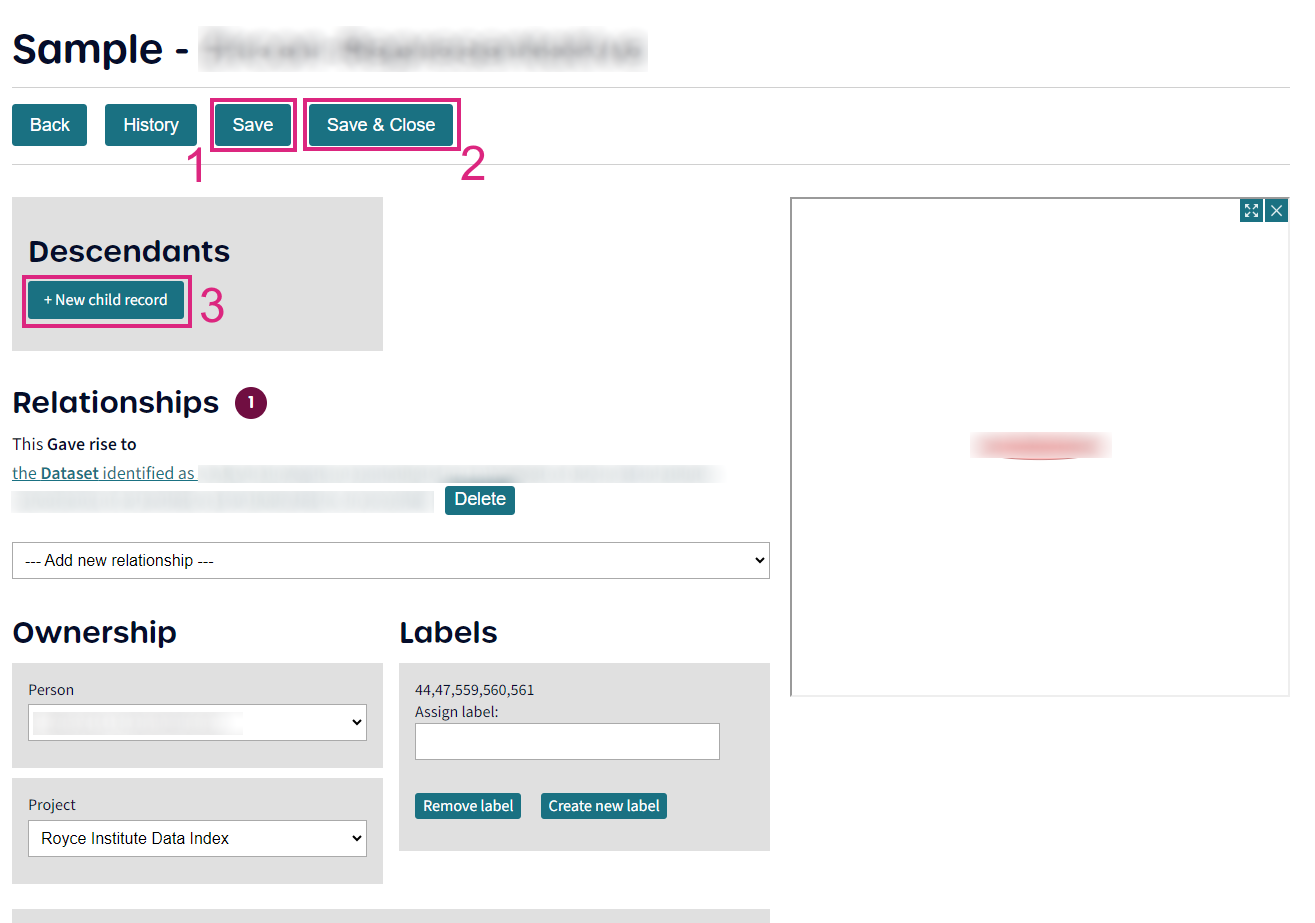
Fig. 12 The Ampletracks Edit Record mode#
You can enter the Record editing mode for any Record that your User owns (this excludes Equipment Records where you need to have elevated permissions to edit beyond creating them).
There are two ways to access the Record editing mode. Either from the Records listing or from within the Record.
Access edit mode from the Record listing#
Navigate to the Record listing of the Record Type of interest
Hover over the cog () icon of the Record of interest, illustrated in item 1 of Fig. 10
You will then see a hover menu, item 2 of Fig. 10
Click on ‘Edit’
You will be redirected to the Edit Record form, shown in Fig. 12
To save changes whilst editing click Save (item 1 in Fig. 12), or Save & Close (item2 in Fig. 12) to exit
Access edit mode from the Record#
Navigate to the Record listing of the Record Type of interest
Hover over the cog () icon of the Record of interest, illustrated in item 1 of Fig. 10
You will then see a hover menu, item 2 of Fig. 10
Click on ‘View’
When in Record view you will see an interface like in Fig. 11
Press on item 1, from Fig. 11, Edit, to enter Record editing mode
To save changes whilst editing click Save (item 1 in Fig. 12), or Save & Close (item2 in Fig. 12) to exit
Dataset Records#
Equipment Records#
Adding a QR code to a Record#
There are several ways to associate a QR code with a Record. In most cases, it is simpler to associate a reserved QR code to a Record, rather than generate one within the Record. Nevertheless, we will show you how to associate QR code labels, and generate them within the Record.
Adding a reserved QR code#
A reserved QR code is one where a sheet of several QR code labels, that are not yet associated with Records, has been printed out.
Usually, we add QR code labels to physical Records, i.e. a physical Sample.
Upon receipt of your QR code label sheet, you will have 56 reserved QR code labels in your possession. A digital representation of part of such a sheet of label is presented in Fig. 13. Item 1 shows where the QR code ID would be. For item 1 we will be ignoring preceding zeroes, i.e. if our QR code label had ID 0000472, the label ID number is 472. Item 2 is the QR code that when scanned will redirect you to the Record associated with the QR code.
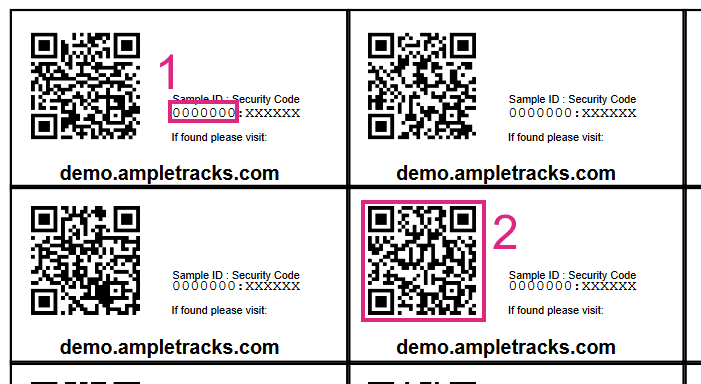
Fig. 13 Example QR code labels#
Attention
You can obtain a sheet of reserved QR codes from your royce.ampletracks.com administrator.
To associate a QR label with your Record:
Navigate to the listing of the Record Type
Enter Record edit mode in any way described in the Editing a Record section
Navigate to the Labels box, as shown in Fig. 14
Type your QR code ID number into the text box
Either:
Click Save
Or,
Click out of the text box
A Submit button will appear
Click the SubmitSubmit button
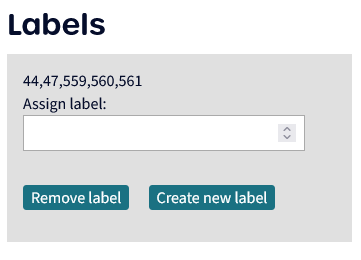
Fig. 14 The assign label ID box#
Adding a new reserved QR code or remove QR code#
There are certain circumstances that would require you to associate a new reserved QR code label to a *Record. For instance, the original physical QR code label getting damaged and not being able to be properly read by a scanner.
In this case, the procedure is the same as the one described in section Adding a reserved QR code.
Following that, the User will decide whether to disassociate a QR label ID with the Record. The process of disassociating a QR label ID with a Record is as follows,
Navigate to the listing of the Record Type
Enter Record edit mode in any way described in the Editing a Record section
Navigate to the Labels box, as shown in Fig. 14
Click the Remove label button
A text box will appear, as shown in Fig. 15
Type the QR label ID number you wish to remove from the Record in the text box
Click Submit
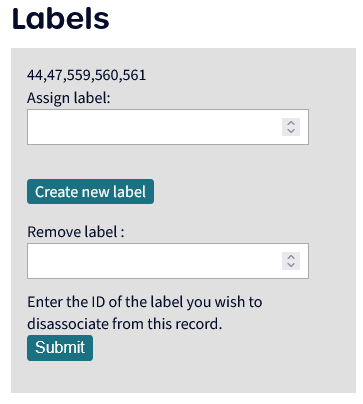
Fig. 15 Example QR code labels#
Scanning a reserved QR code to Create a Record#

Fig. 16 The ‘Scan Label’ button#
SECTION UNDER CONSTRUCTION
Important
The following instructions will work on both Desktop and Mobile Phone browsers.
Within the main user interface of royce.ampletracks.com,
Ensure that you are logged in to Ampletracks on your browser of choice.
Either,
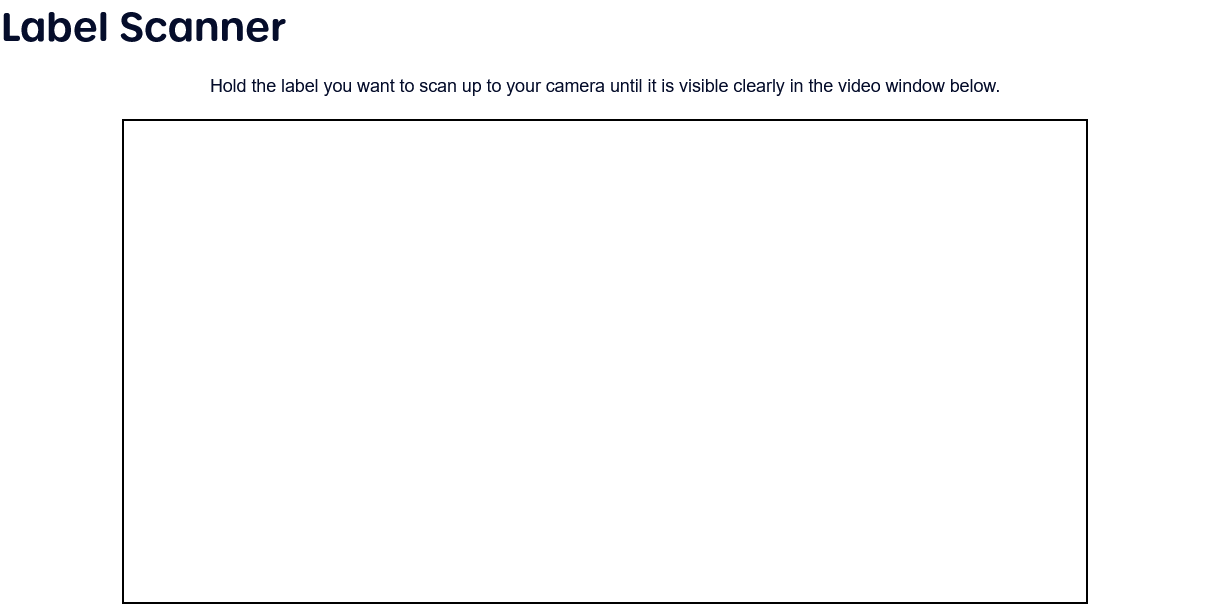
Fig. 17 The ‘Label Scanner’ page#
Creating a QR code within the Record#
Warning
This is not recommended unless you have the recommeded blank label papers. Our standard type of blank sheet is Avery B7651 which can be used to print 65 labels.
We will be creating a brand new label within Record edit mode.
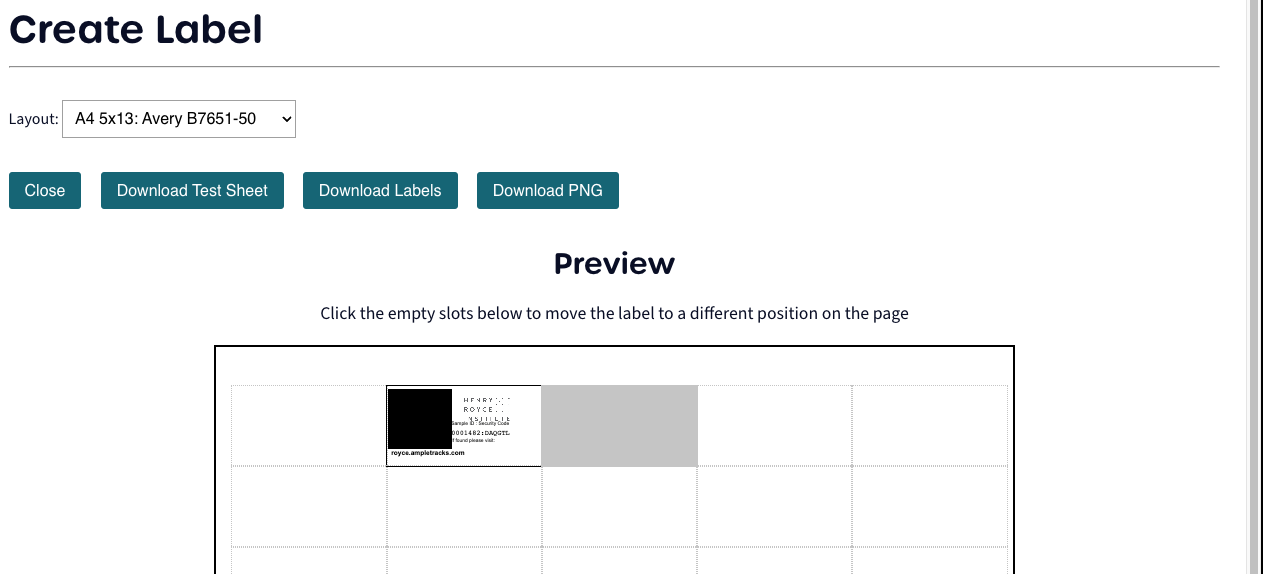
Fig. 18 Create a label configurer#
Navigate to the listing of the Record Type
Enter Record edit mode in any way described in the Editing a Record section
Navigate to the Labels box, as shown in Fig. 14
Click the Create new label button
You will be redirected to a the Create Label preview page where you can configure your label printing by selecting the size of label, by selecting the layout, and which region it will be printed on the blank sheet, shown in Fig. 18
Click on the Download Labels button, which will download the label sheet as a PDF on your local drive
Print the PDF of the label on one of the recommended blank label sheets
Important
We recommed you first print out the labels on blank plain paper so you can make any scale adjustments within a PDF editor.
Record Relationships#
Relationships between Record Types#
We have specified a number of Record Type Record Type relationships in royce.ampletracks.com. Please see Table 1 for these Relationships.
Record Type |
relates to |
Record Type |
Notes |
|---|---|---|---|
Sample |
Belongs to |
Sub project |
|
Was produced in |
Experiment |
||
was measured using |
Equipment |
||
Gave rise to |
Dataset |
||
Equipment |
Used on |
Sample |
for data acquisition or measurements |
Used to produce |
Sample |
for sample creation or synthesis |
|
Produced |
Dataset |
||
Was used in |
Experiment |
||
Dataset |
was produced in the sub project |
Sub Project |
|
Was produced using |
Equipment |
||
Relates to |
Sample |
||
Was produced in |
Experiment |
||
was analysed by |
Analysis Tool |
||
Analysis Tool |
analysed |
Dataset |
|
Sub project |
owns |
Sample |
|
produced |
Dataset |
||
includes |
Experiment |
Create a relationship between two records#
There are a number of relationships specified between Record Types on royce.ampletracks.com. These Record Type to Record Type relationships are extrinsic, as opposed to the intrinsic Parent Child relationships that can be created within a Record.
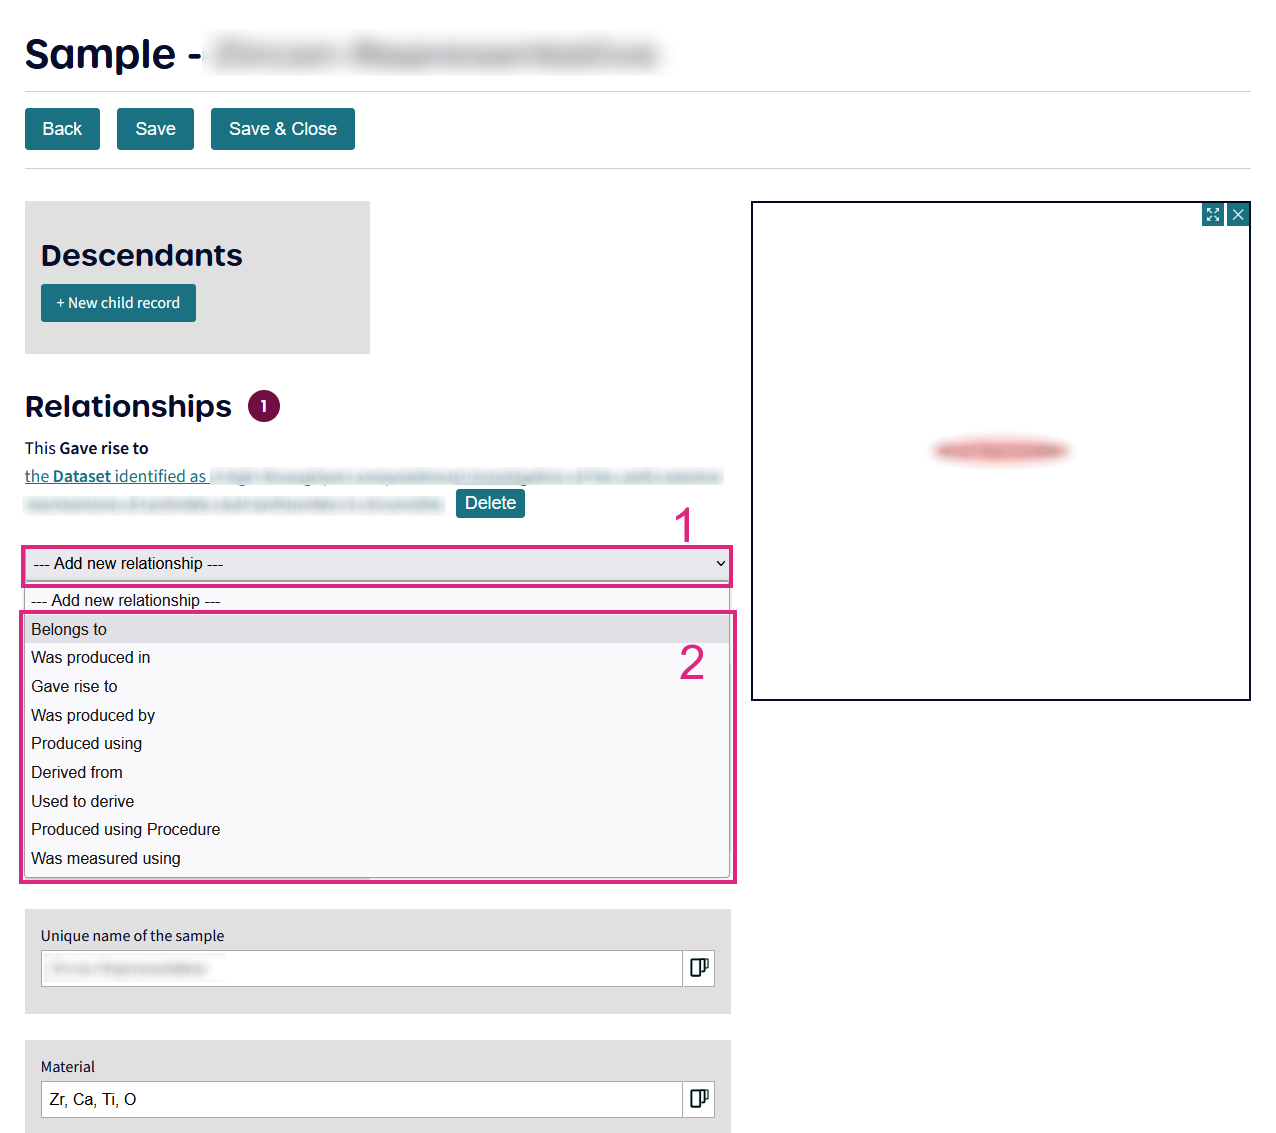
Fig. 19 Create Relationships between Records#
To add a Relationship between Records of different Record type,
Navigate to the Record you are interested in and enter Edit mode
Choose the ‘— Add new relationship —’ dropdown, item 1 in Fig. 19
Choose the relationship type (these are specific to other Record Types), item 2 in Fig. 19
Start typing in the name of the Record you want to relate to the Record in Edit mode, Fig. 20
You will then see a number of Records listed as
ID:Name-of-Record Name-of-OwnerChoose the Record you want to relate to the Record in Edit mode or to Create a new Record
Save (item 1 in Fig. 12), or Save & Close (item2 in Fig. 12) to exit
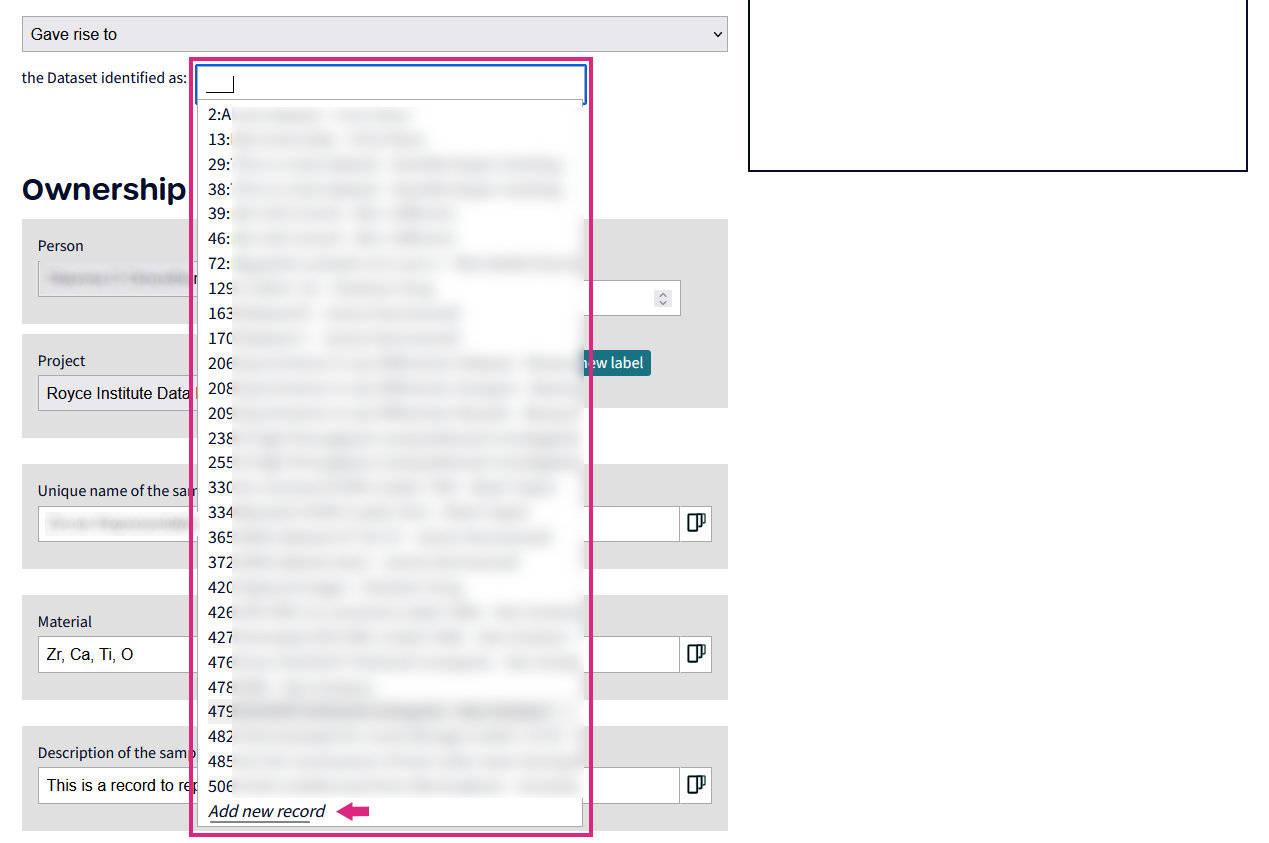
Fig. 20 Various Records for Relationship option#